Posts

Lab 10: Radar remote sensing

Image
Goals and background: The goal of this lab was to familiarize students with specific procedures associated with radar remote sensing images. The specific functions that were practiced were noise reduction (salt and pepper effect reduction) through speckle filtering, spectral and spatial enhancement, multi-sensor fusion, texture analysis, polarimetric processing, slant-range to ground-range conversion. Methods: Part 1 Section 1: Speckle suppression 25 m spatial resolution satellite (microwave) L-band remotely sensed images from the Shuttle Imaging Radar (SIR-A) experiment of the Lop Nor Lake in the Xinjiang Province of China were brought into ERDAS Imagine. The area includes a former lake bed with a basin area and also a cliff overlooking that basin. Figure 1 shows a regular oblique aerial image of the area found on Wikipedia. Figure 1: Oblique aerial imagery of Lop Nor Lake Speckle reduction was used to improve clarity of this image, this was found in the Utilities folder

Lab 9: Hyperspectral remote sensing

Image
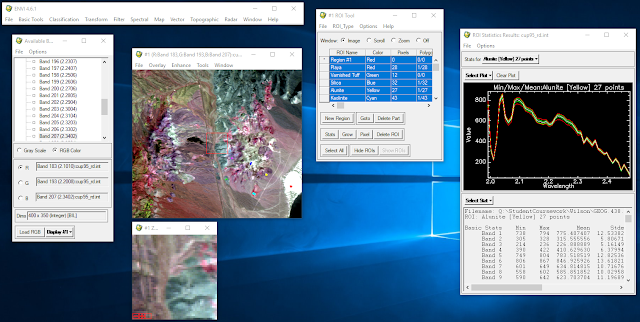
Goals and Background: In this lab hyperspectral data was introduced. The goal of the lab was to become familiar with various functions and procedures associated with this type of data. Hyperspectral data was atmospherically corrected using the FLAASH radiative transfer code method, hyperspectral signatures were plotted and compared to sample signatures, hyperspectral data was animated to show all bands, hyperspectral data was used in combination with various indecies to produce vegetation analysis data, and hyperspectral data was corrected for noise. Methods: Part 1 Section 1: Plotting hyperspectral signatures  An JPL-calibrated AVIRIS image including 50 bands from 1.99 to 2.48 µm was brought into ENVI, and provided regions of interest of different minerals were opened after displaying the 183, 193, and 207 bands in RGB. Histograms for these ROIs were then opened and compared, paying special attention to features of the plots that could be used to identify one mineral from anot

Lab 8: Expert System/Decision Tree and Artificial Neural Network Classifiers

Image
Goals and Background: The goal of this lab was to gain experience in correcting classification with the expert system/decision tree method leveraging ancillary data, and performing a neural network classification. The expert system/decision tree method for classification allows the user to create shapes that designate an area where the user would like to change specific classes to other classes in an existing classified image by using whatever ancillary data is available to the user to consult. This is performed in ERDAS Imagine. The neural network classifier simulates the structure of the human brain in performing its black box classification based on a users input parameters and data, and can be performed in ENVI. The Methods: Part 1: Classification using the expert system/decision tree method This section was performed using the Knowledge Engineer tool in ERDAS Imagine. In examining the provided classified image of the cities of Eau Claire and Chippewa Falls it was evident

Lab 7: Object-based classification

Image
Goals and Background: The objective of this lab was to become familiarized with object-based land use/land cover (LULC) classification performed in Trimble eCognition. This process is made up of a few different processes: first segmentation of images into objects (clusters of pixels grouped based on spatial and spectral homogeneity vectorized), then training and setup of random forest and then support vector machine classifiers, and finally refining of the classification output from the classifiers. Methods: Part 1: Creating the eCognition project A new project was created in eCognition using Landsat 7 ETM+ imagery supplied from June 9, 2000. The data brought in included the 6 bands from the sensor, however which bands these were was unspecified. The resolution of the imagery was set at 30 meters as this was the spatial resolution of all of the layers, and a global value of zero was set for cases of no data. The layer mixing button was now clicked in the top bezel   , and the